Windows 11 retains plenty of accessibility from Windows 10, with night light being one of them. It was first introduced in Windows 10 in 2017 to lower the amount of blue light on your computer screen, which can cause eye strain if you use your system for hours in dark surroundings. It can even disrupt your circadian rhythm and sleep cycle by lowering the amount of melatonin produced by your body.
Windows 11’s night light feature decreases the harmful effects of blue light by switching your screen’s colors to warmer and reddish hues. This article goes over all possible ways for you to enable night light on your Windows 11 system.
How to enable night light using Quick Settings
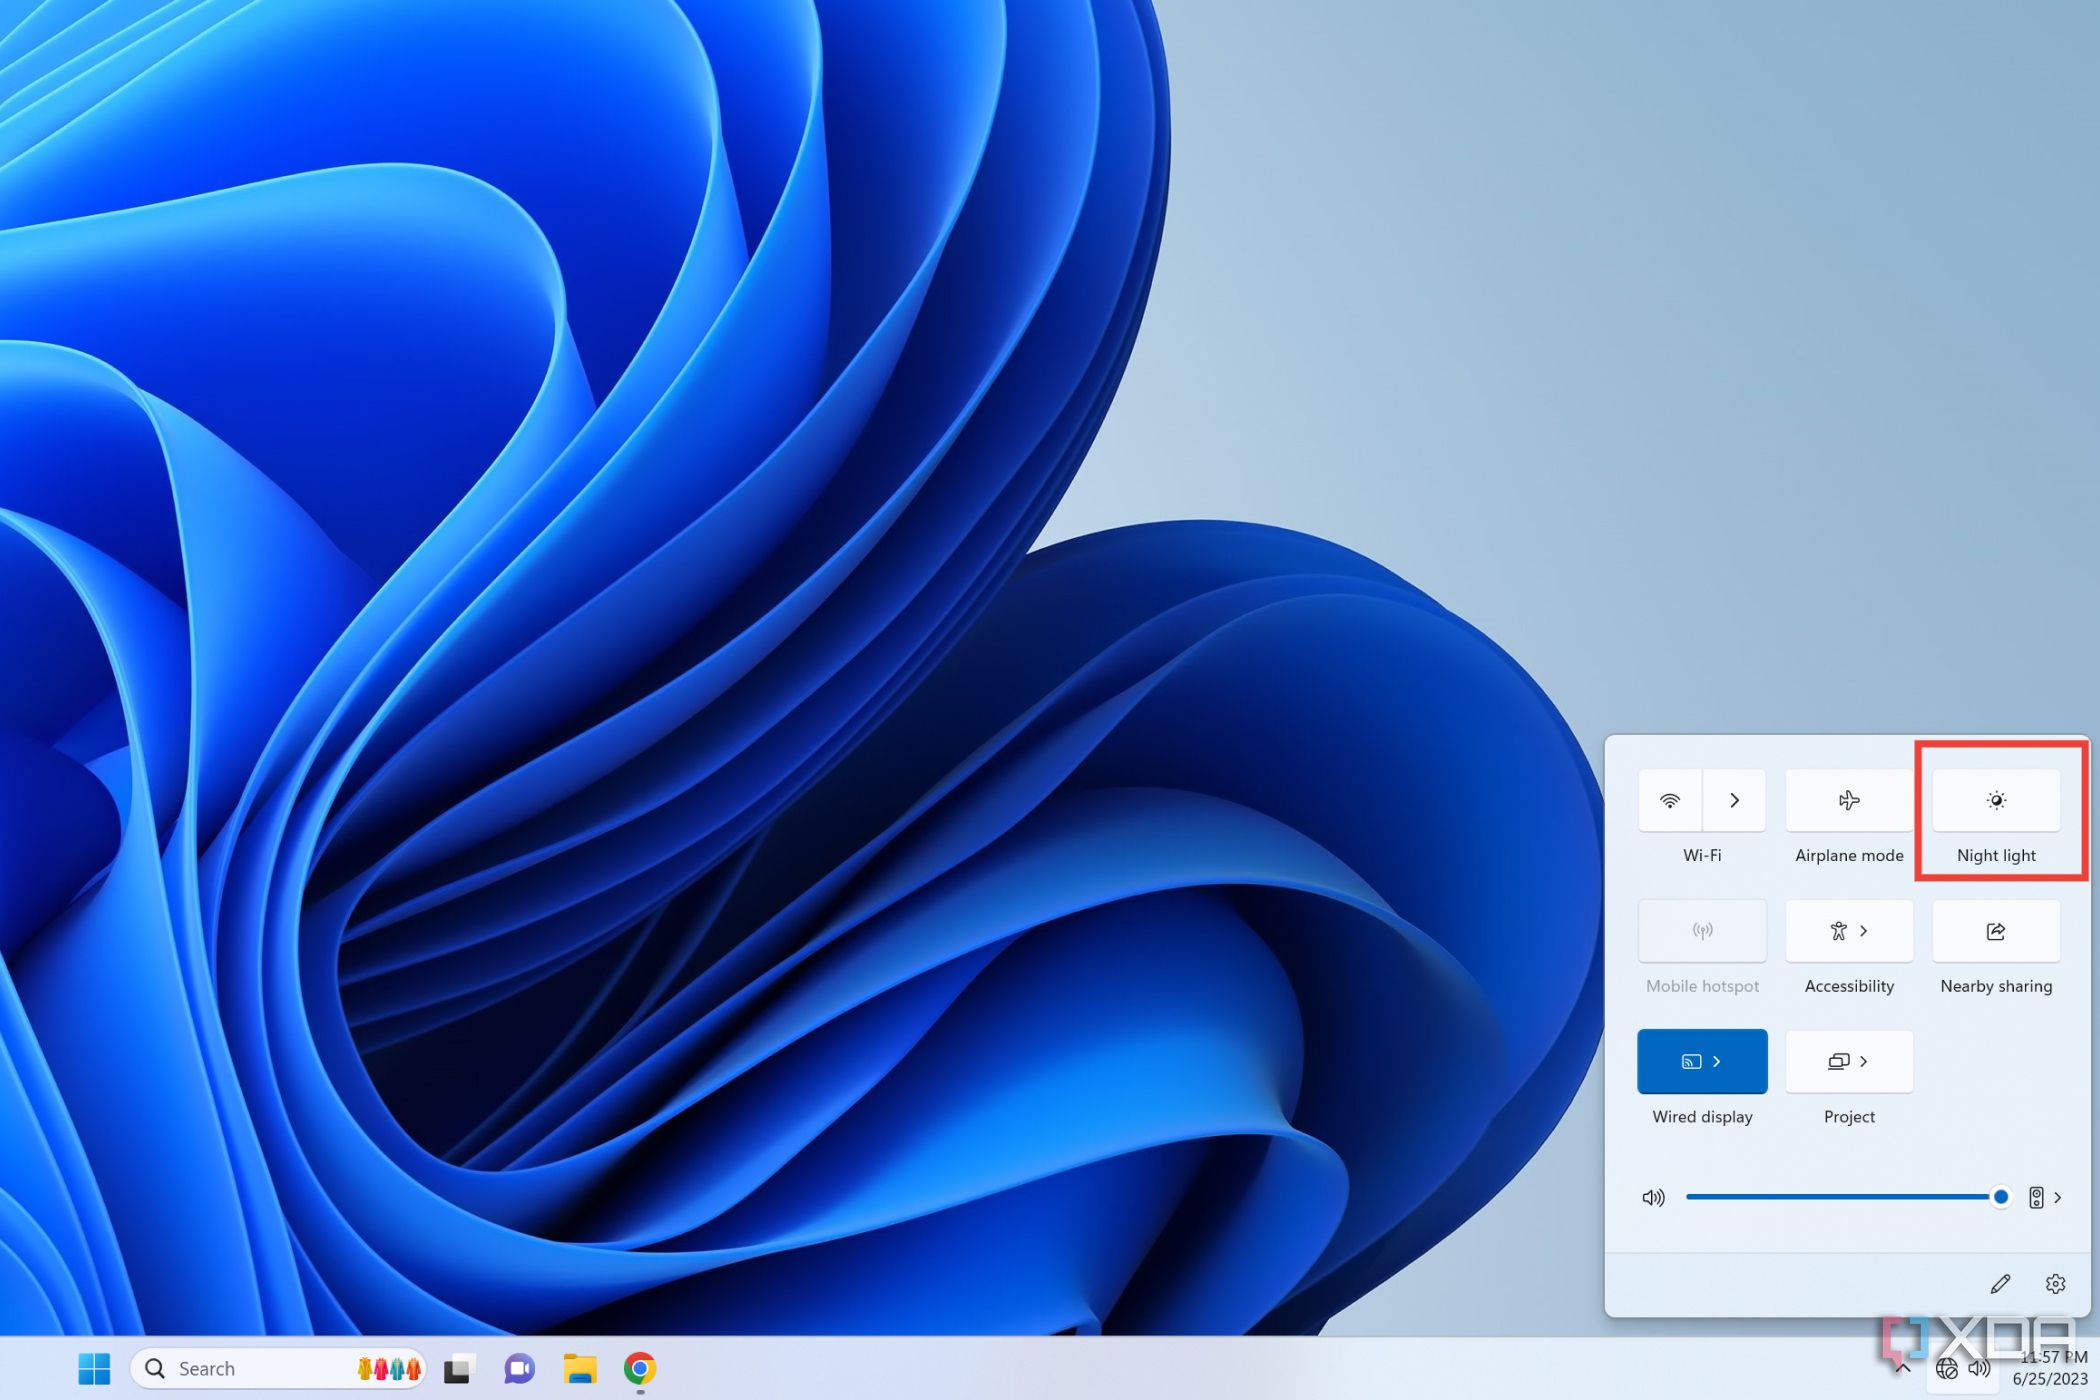
The most straightforward way to turn on the night light is via Quick Settings.
- Press Win + A to open Quick Settings at the bottom right portion of the screen.
- The Night light button will be available in the first row of the list of icons. Pressing it once will enable it for your display.
This method is only useful if you don’t want to alter the default night light configuration. I would suggest using it after you set up a custom night light profile using Settings.
How to enable night light using Settings
Enabling the night light feature via Settings is the longer of the two native methods provided by Windows 11, but it can also allow you to tweak the night light configuration to suit your needs.
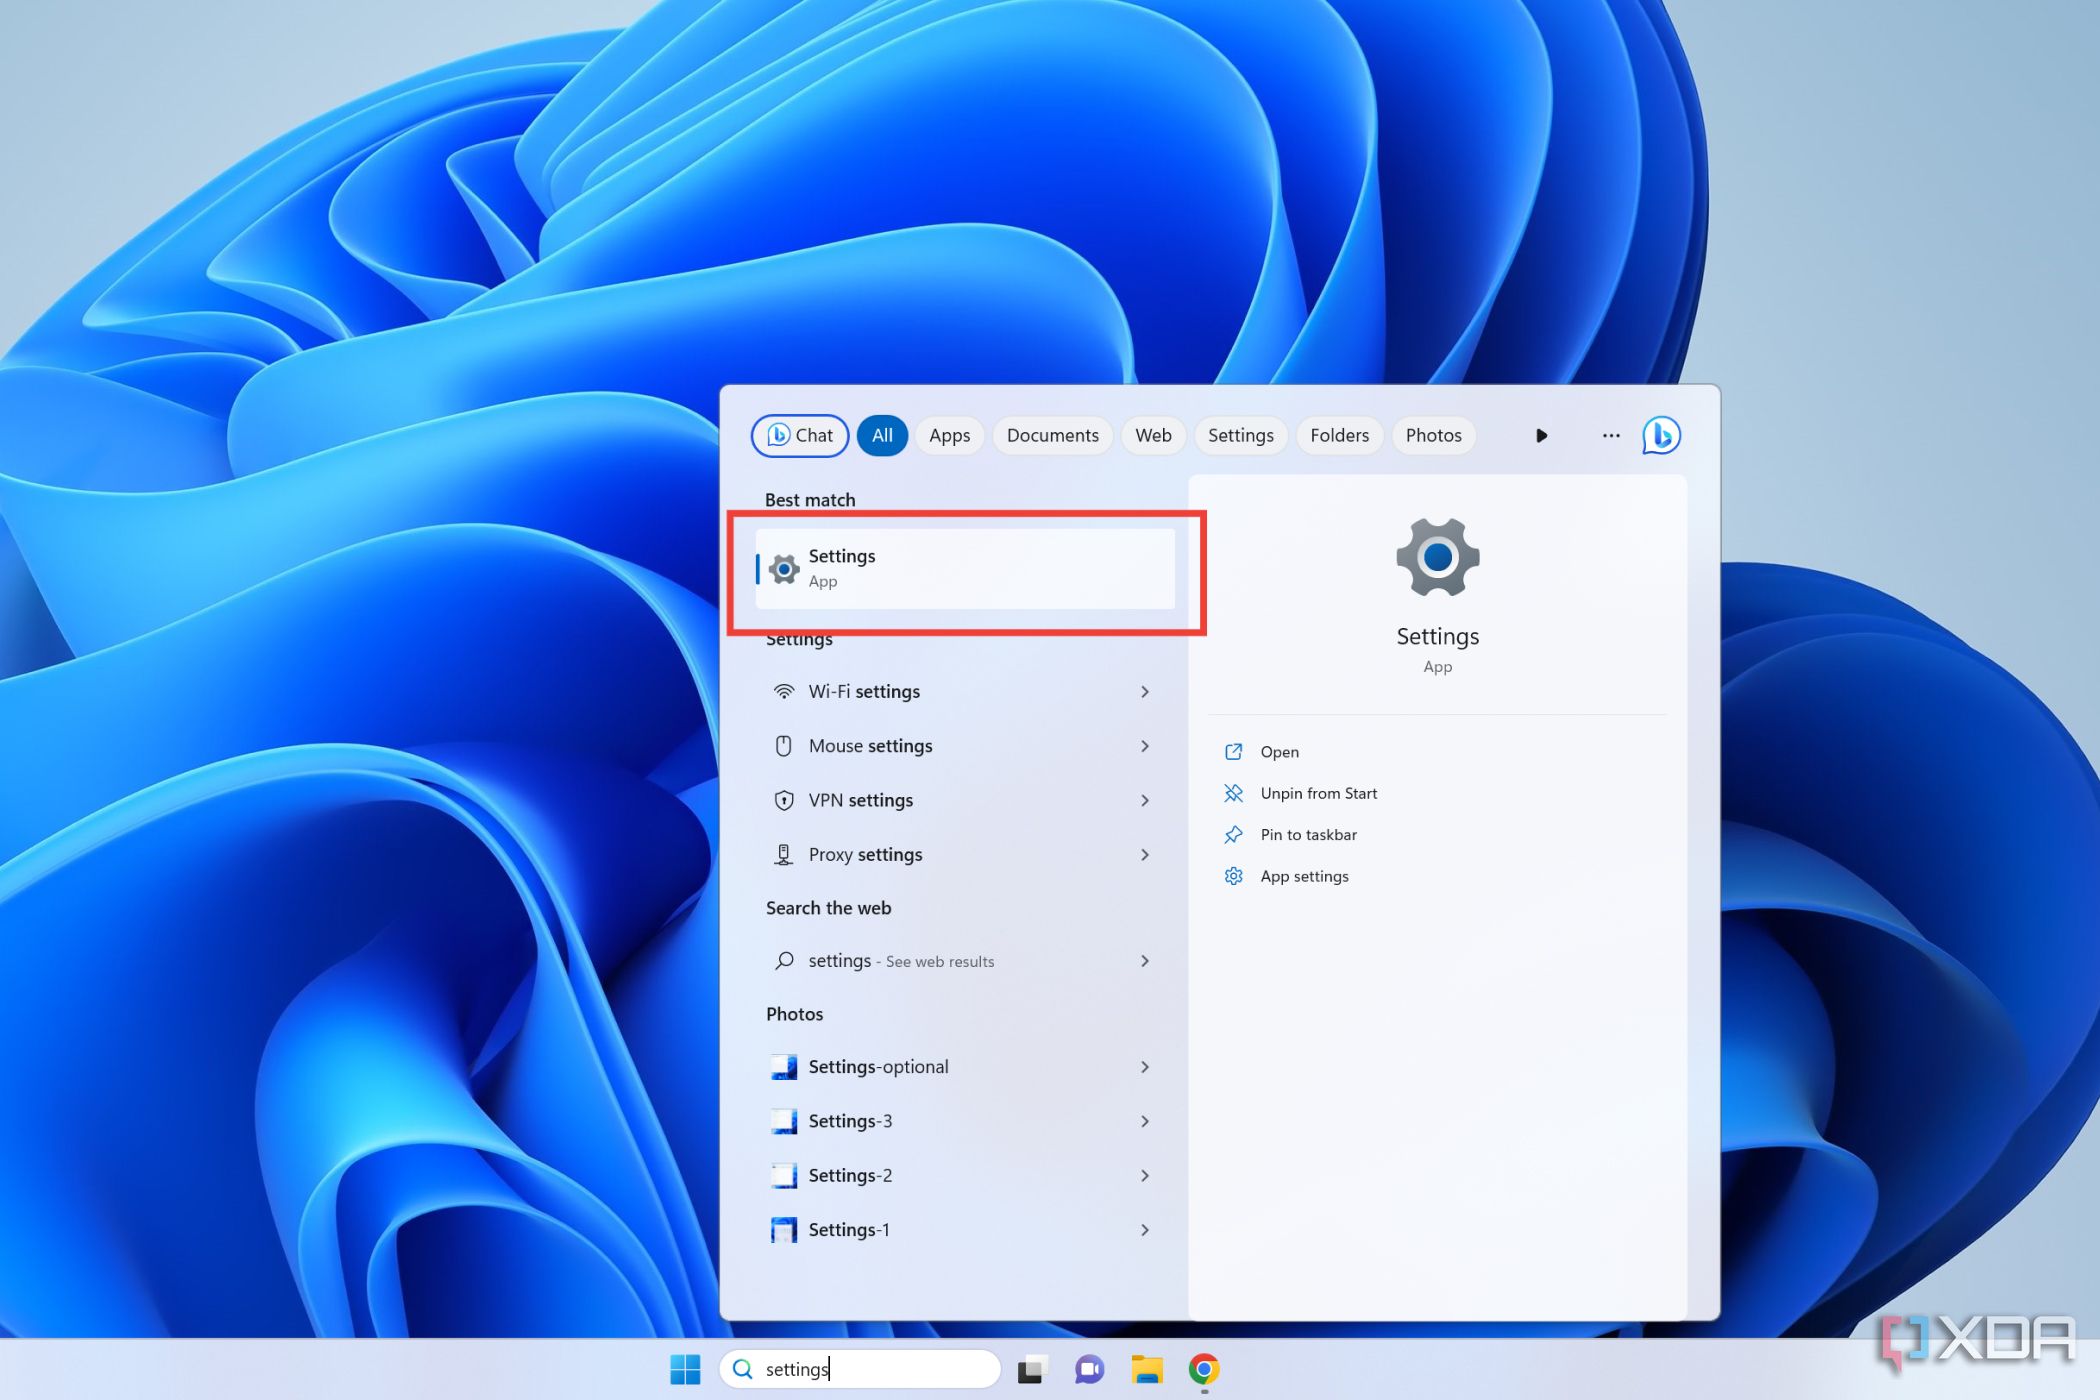
- Type settings into the Search bar and click on Settings.
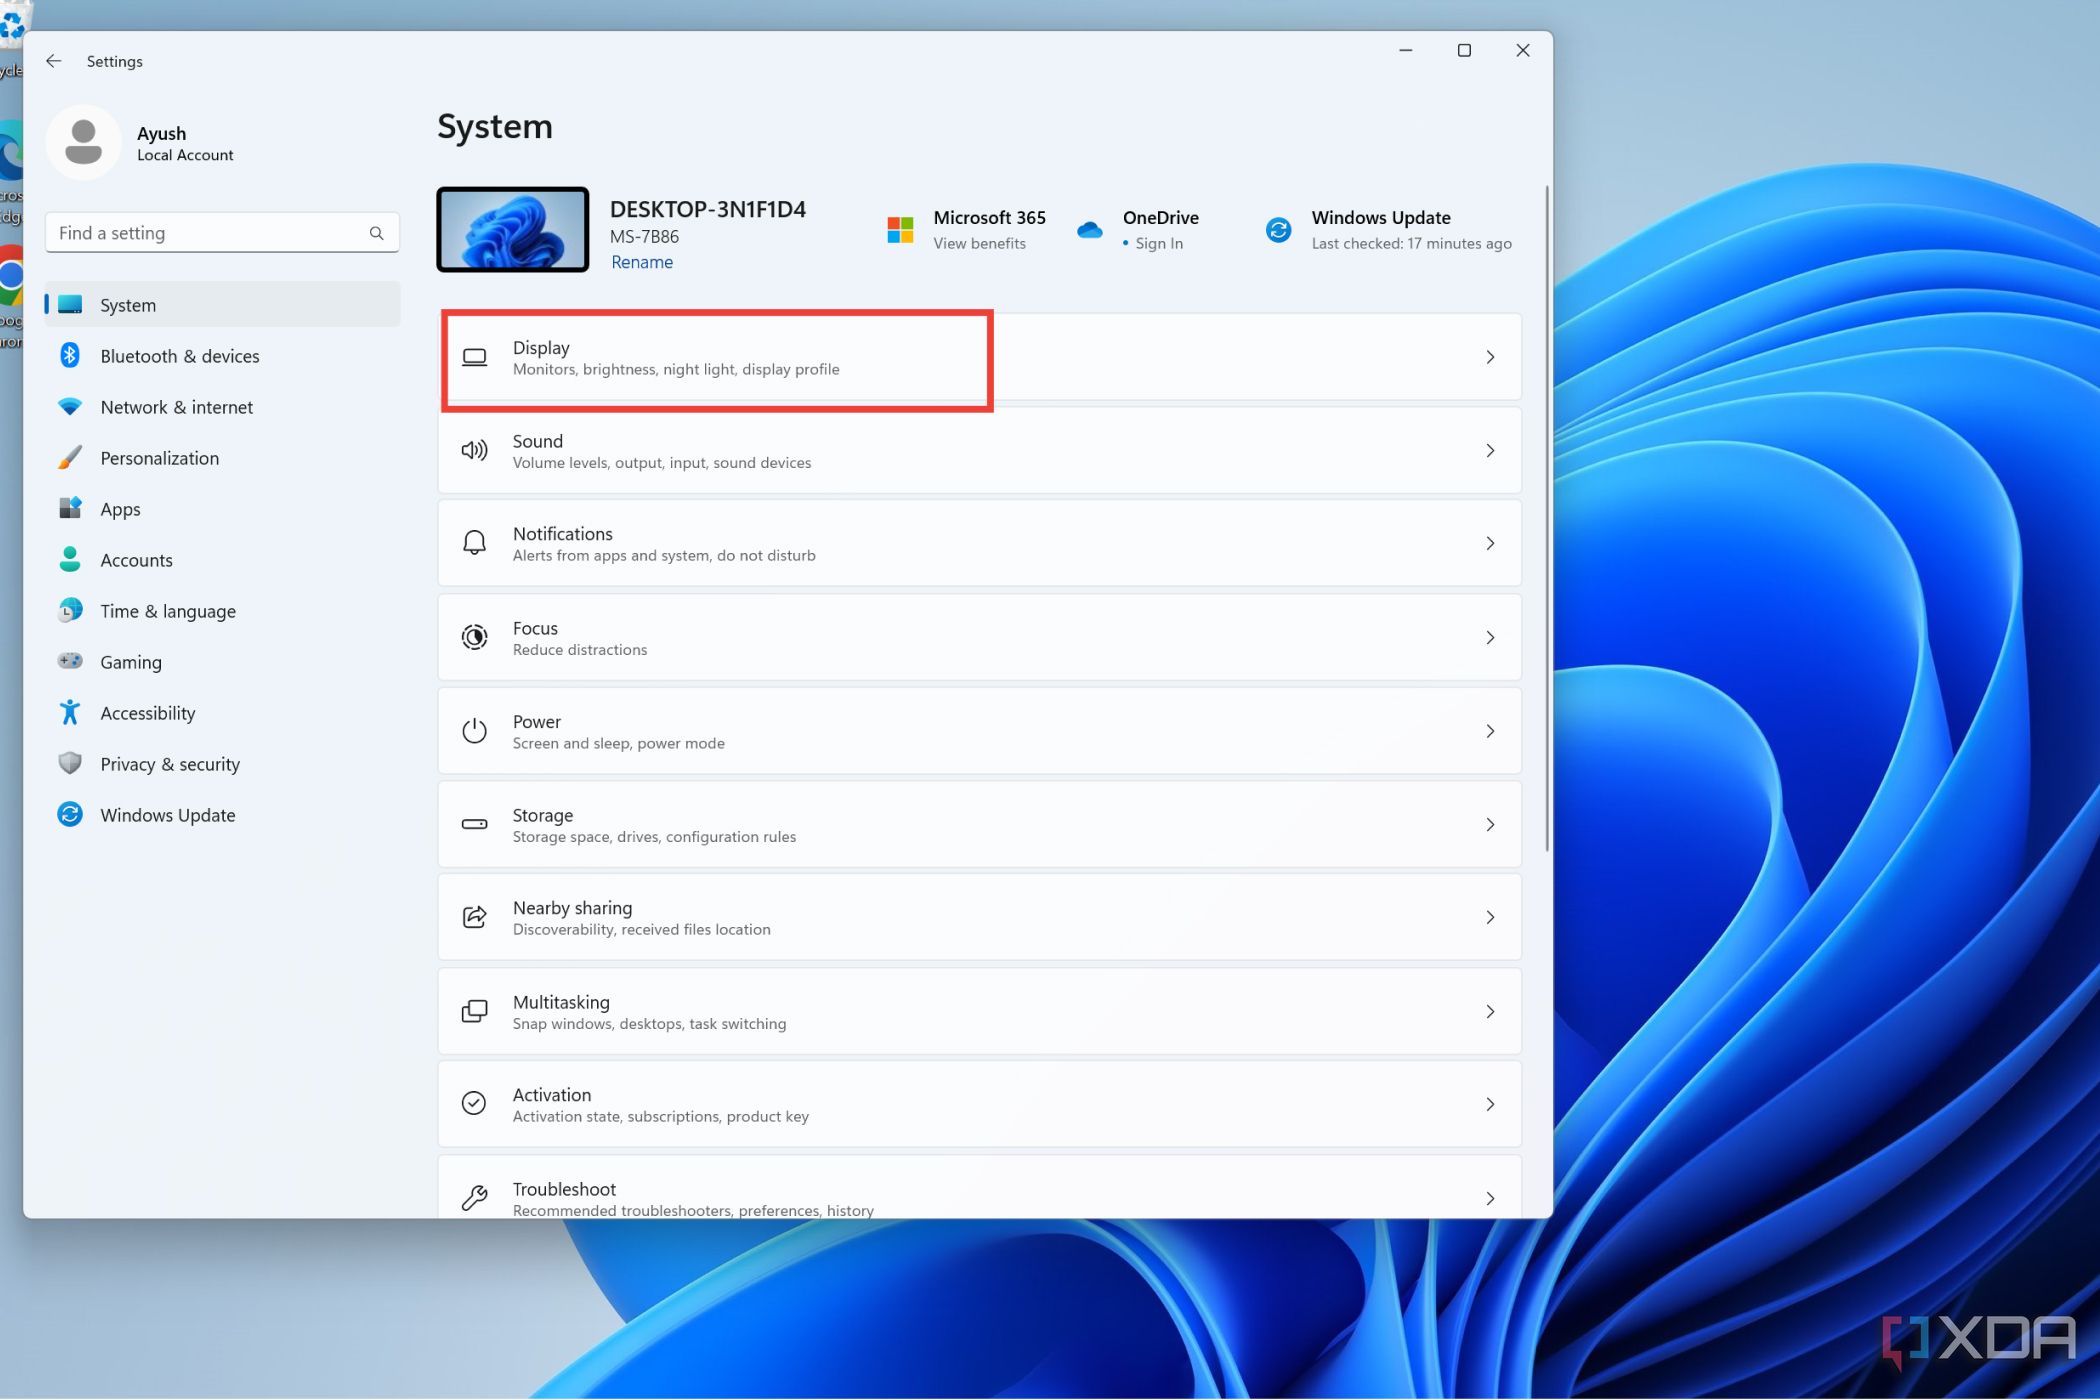
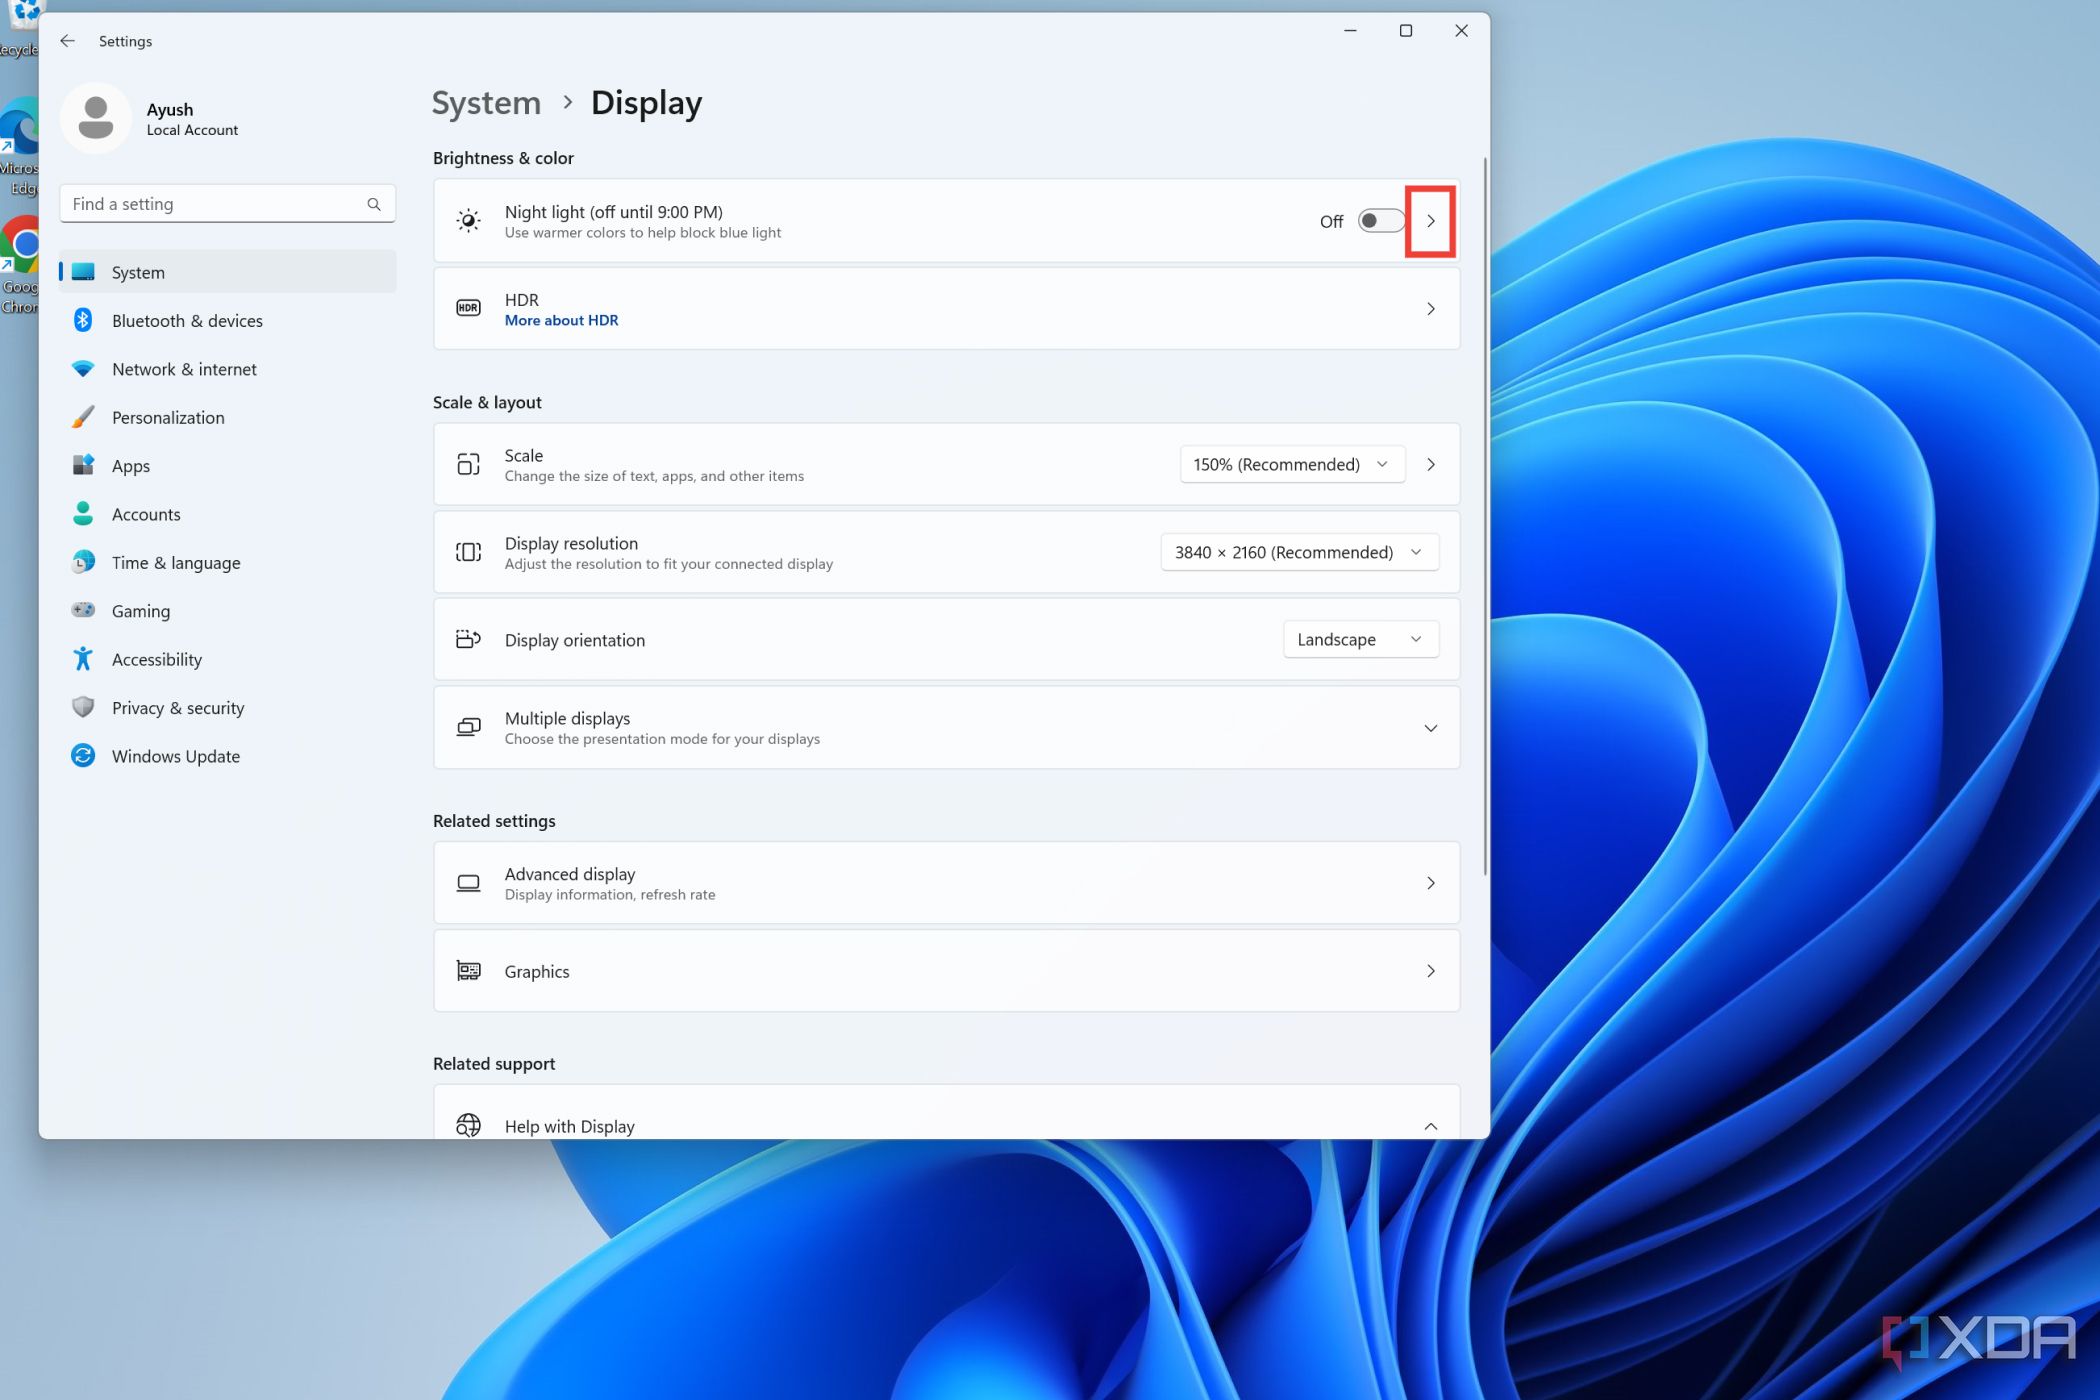
- Select the System tab and choose the Display settings.
- Press the Night light toggle to turn it on.
How to change the color temperature of night light
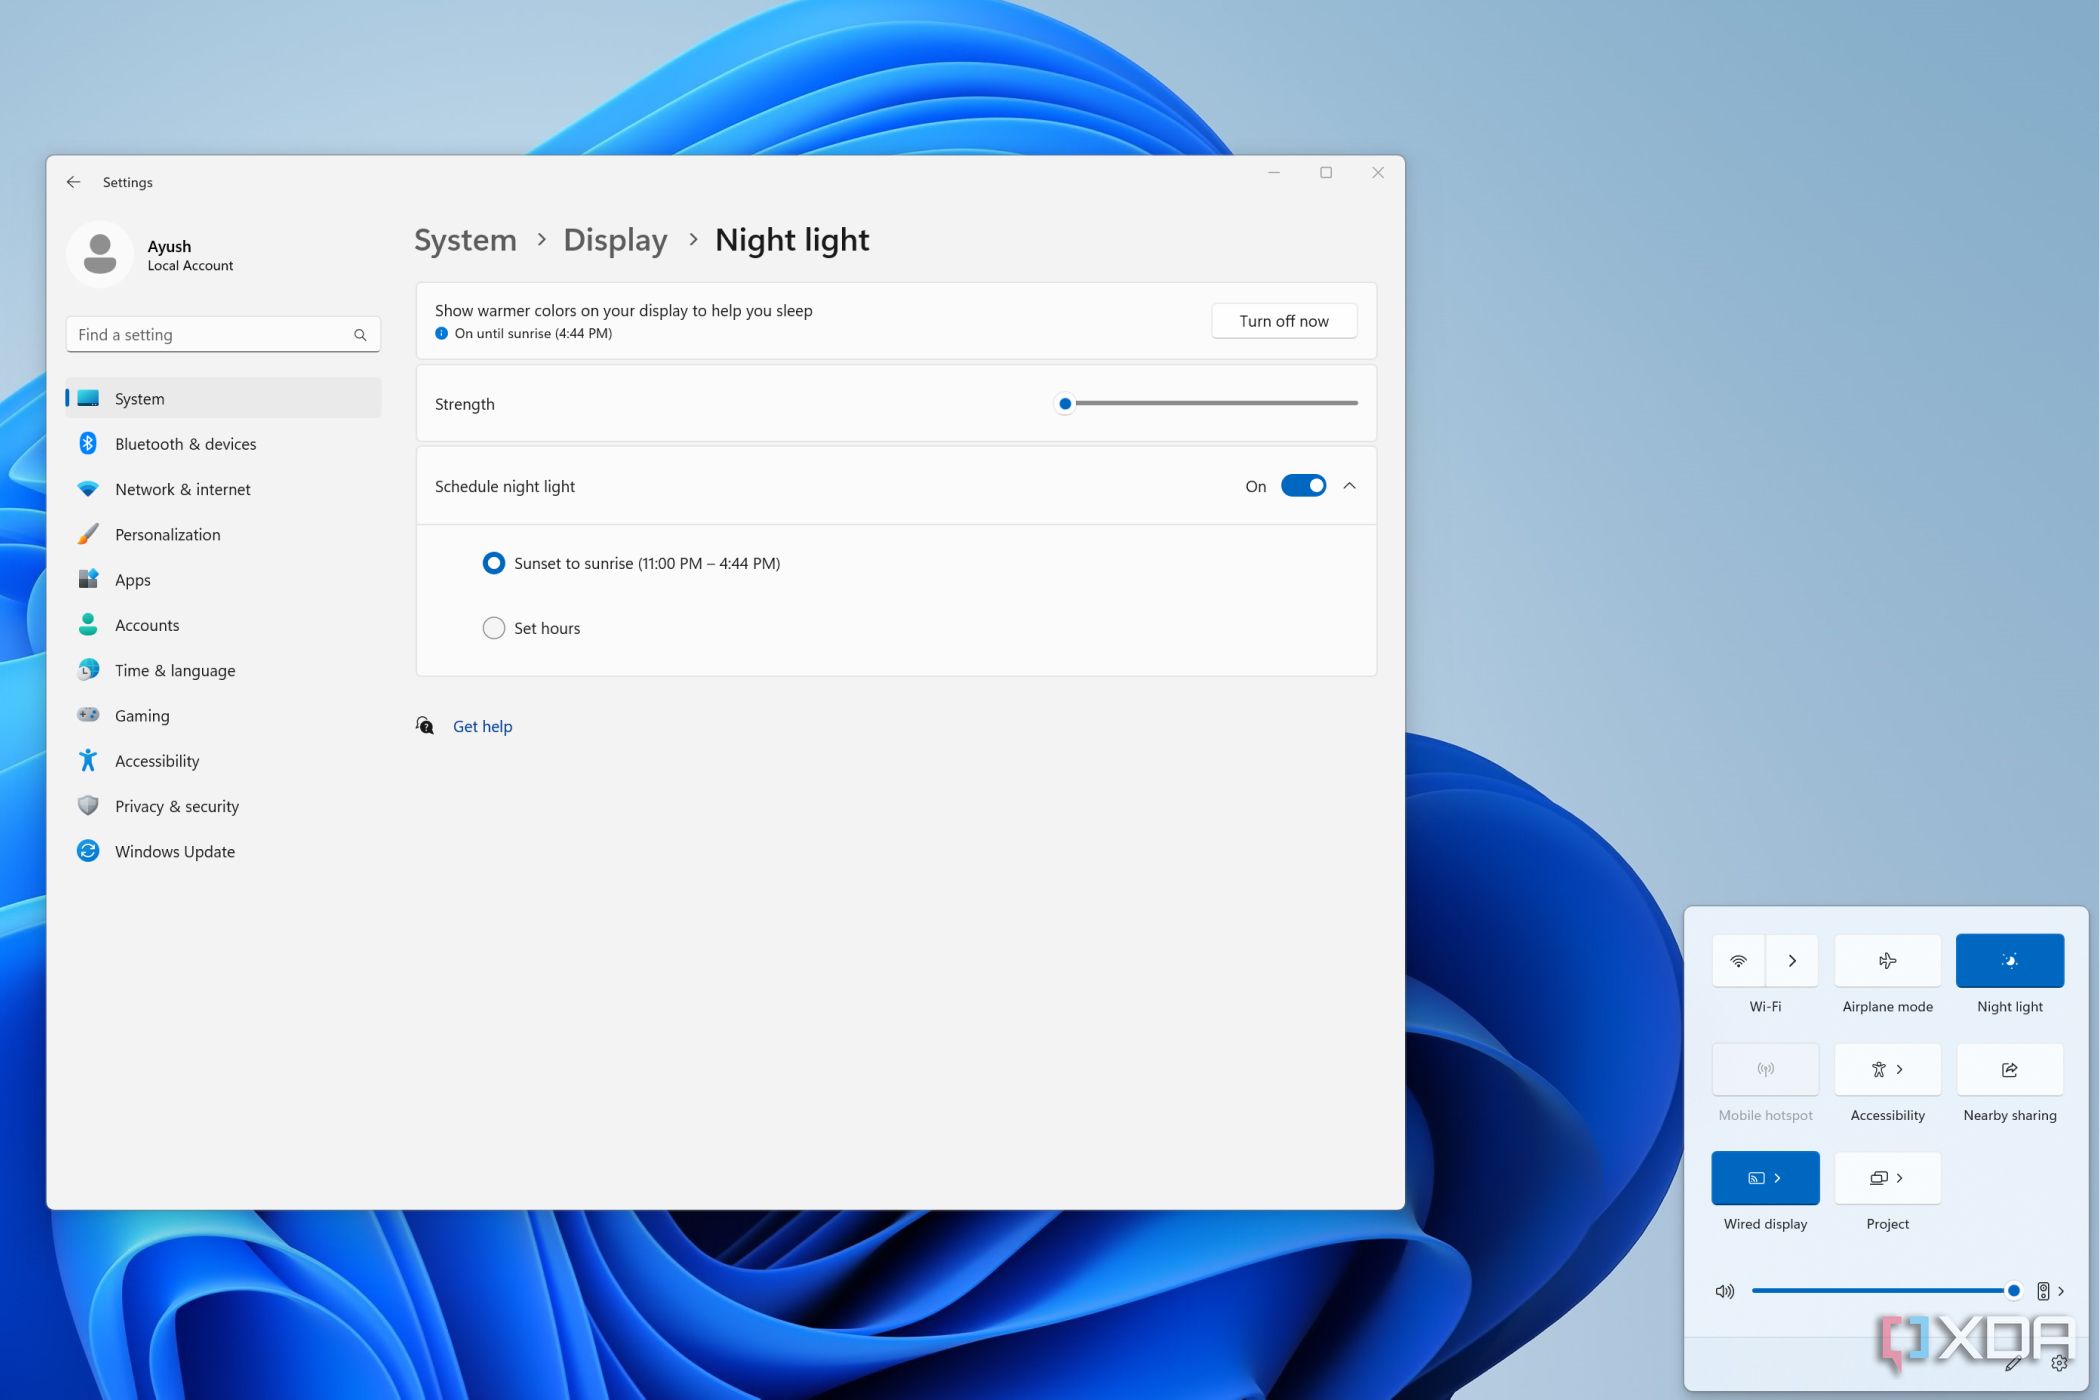
Windows 11 allows you to modify the strength of the night light to adjust the color temperature of the screen when it is enabled. You can follow these steps to modify its color tones.
- Click on the arrow icon at the end of the Night light tab.
- You can adjust the color temperature of the night light using the Strength slider.
- Dragging the slider toward the left will reduce the blue light filter effect while moving it toward the right will make the colors warmer.
How to schedule night light
Windows 11 also provides the facility to auto-enable the night light at specific times. You can set the start and shutdown times or have the OS turn it on from sunset to sunrise.
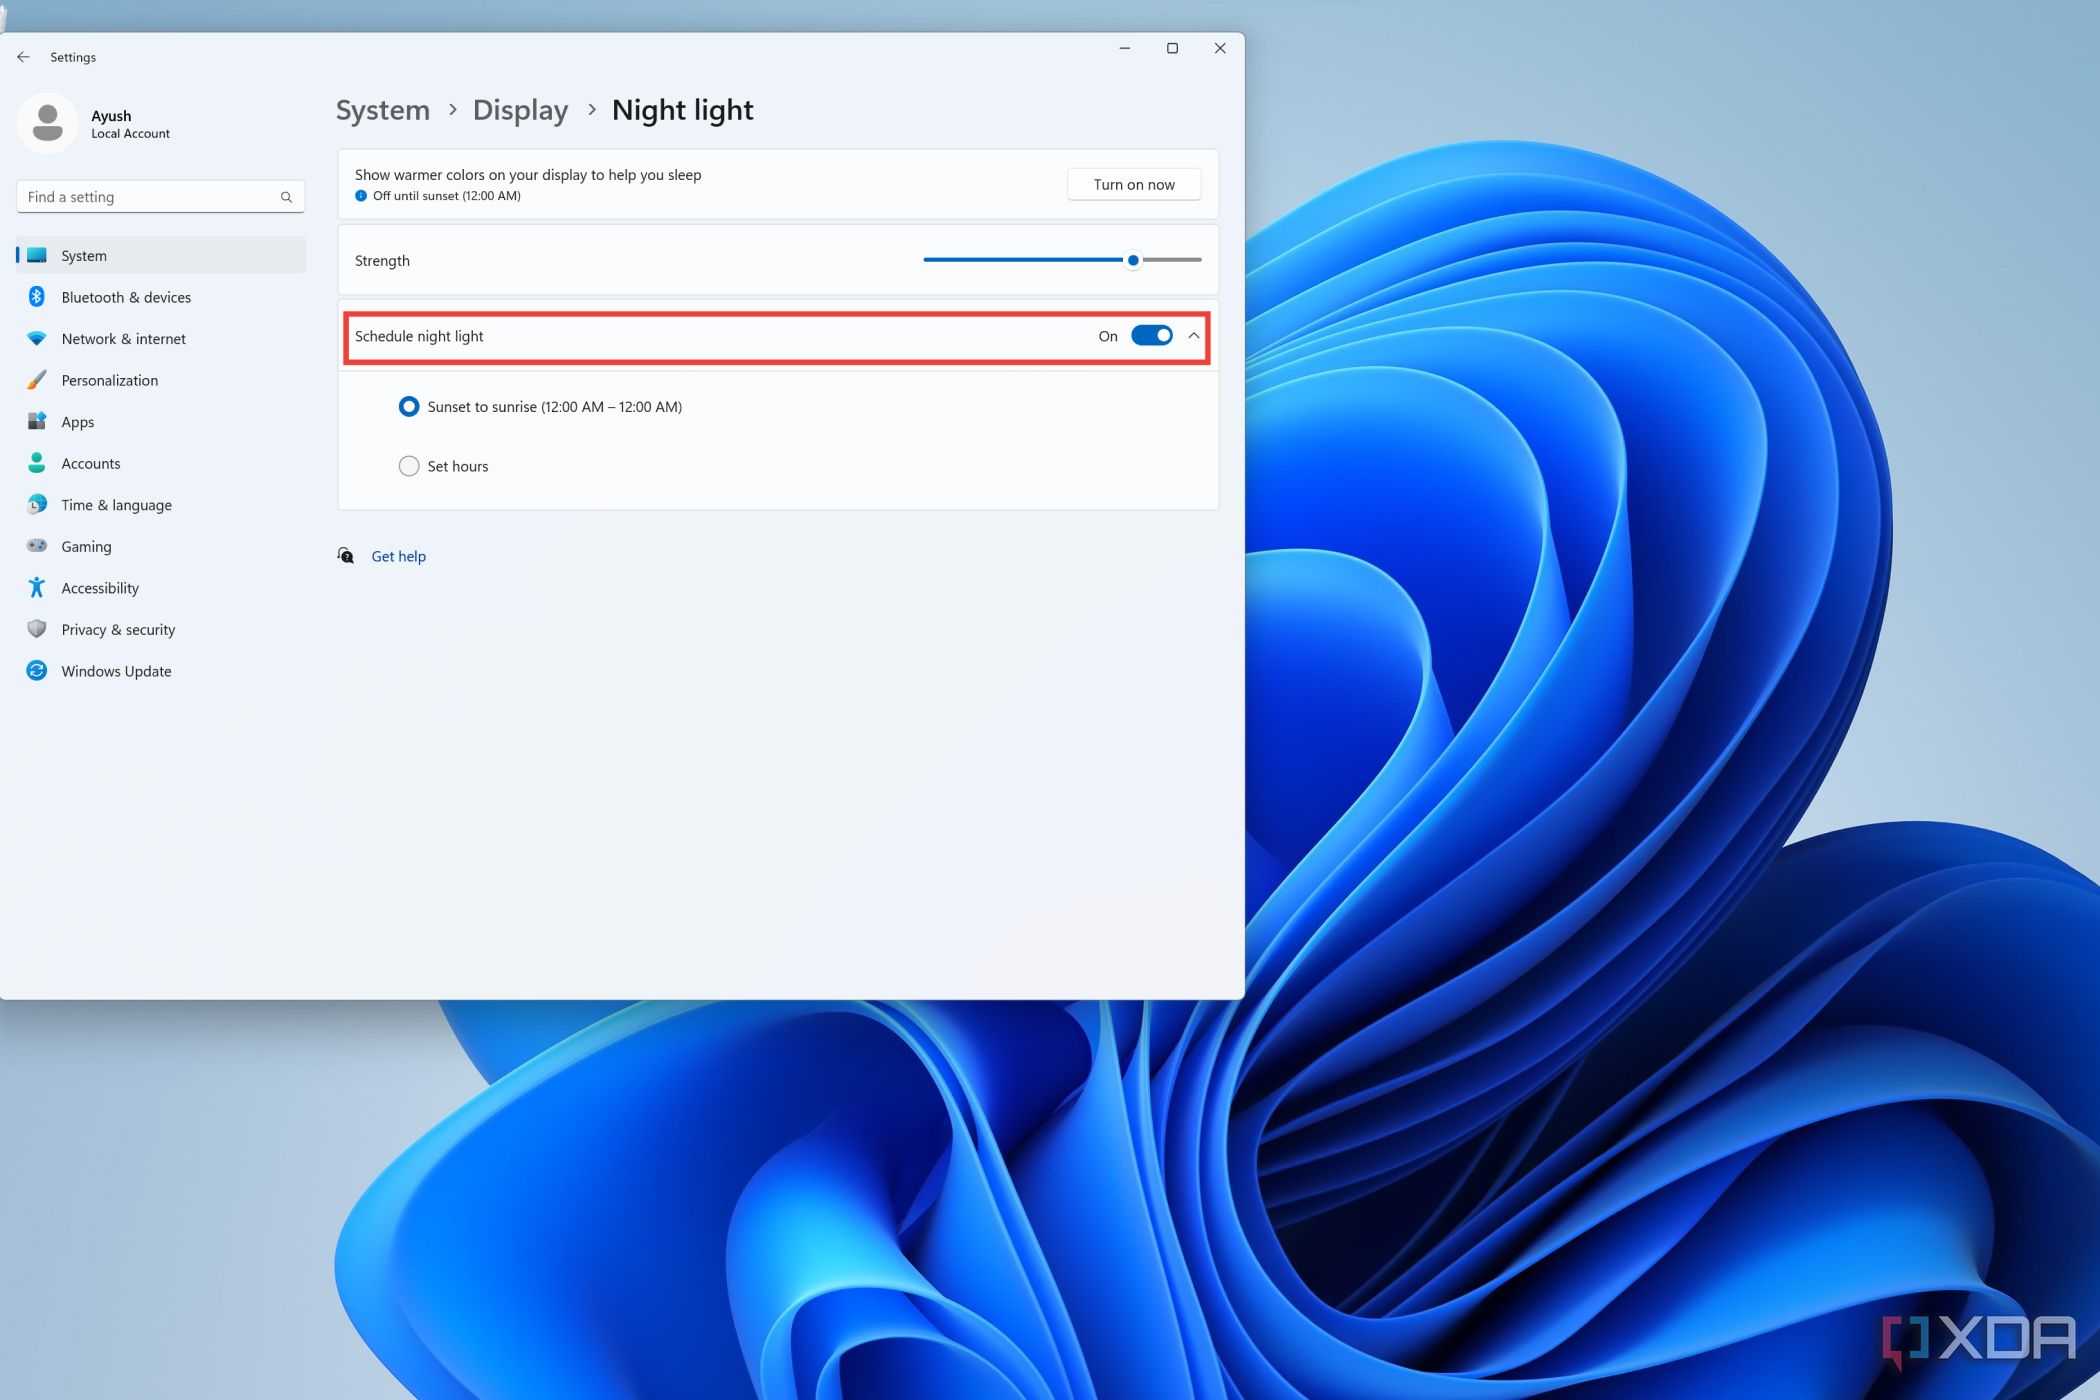
- Press the Arrow button at the end of the Night light tab.
- Click on the Schedule night light button to automatically enable the feature from sunset to sunrise. You will need to turn on the location settings for this option to show up.
- Alternatively, you can manually enter the startup and shutdown times for the night light.
What to do if the night light settings are grayed out
Sometimes, the night light settings may be grayed out due to some compatibility issues with your display drivers or incorrect registry values. In this case, you can modify certain registry settings to get the night light settings to show up on your system.
- Right-click on the Start button and select Run.
- Type regedit and press OK.
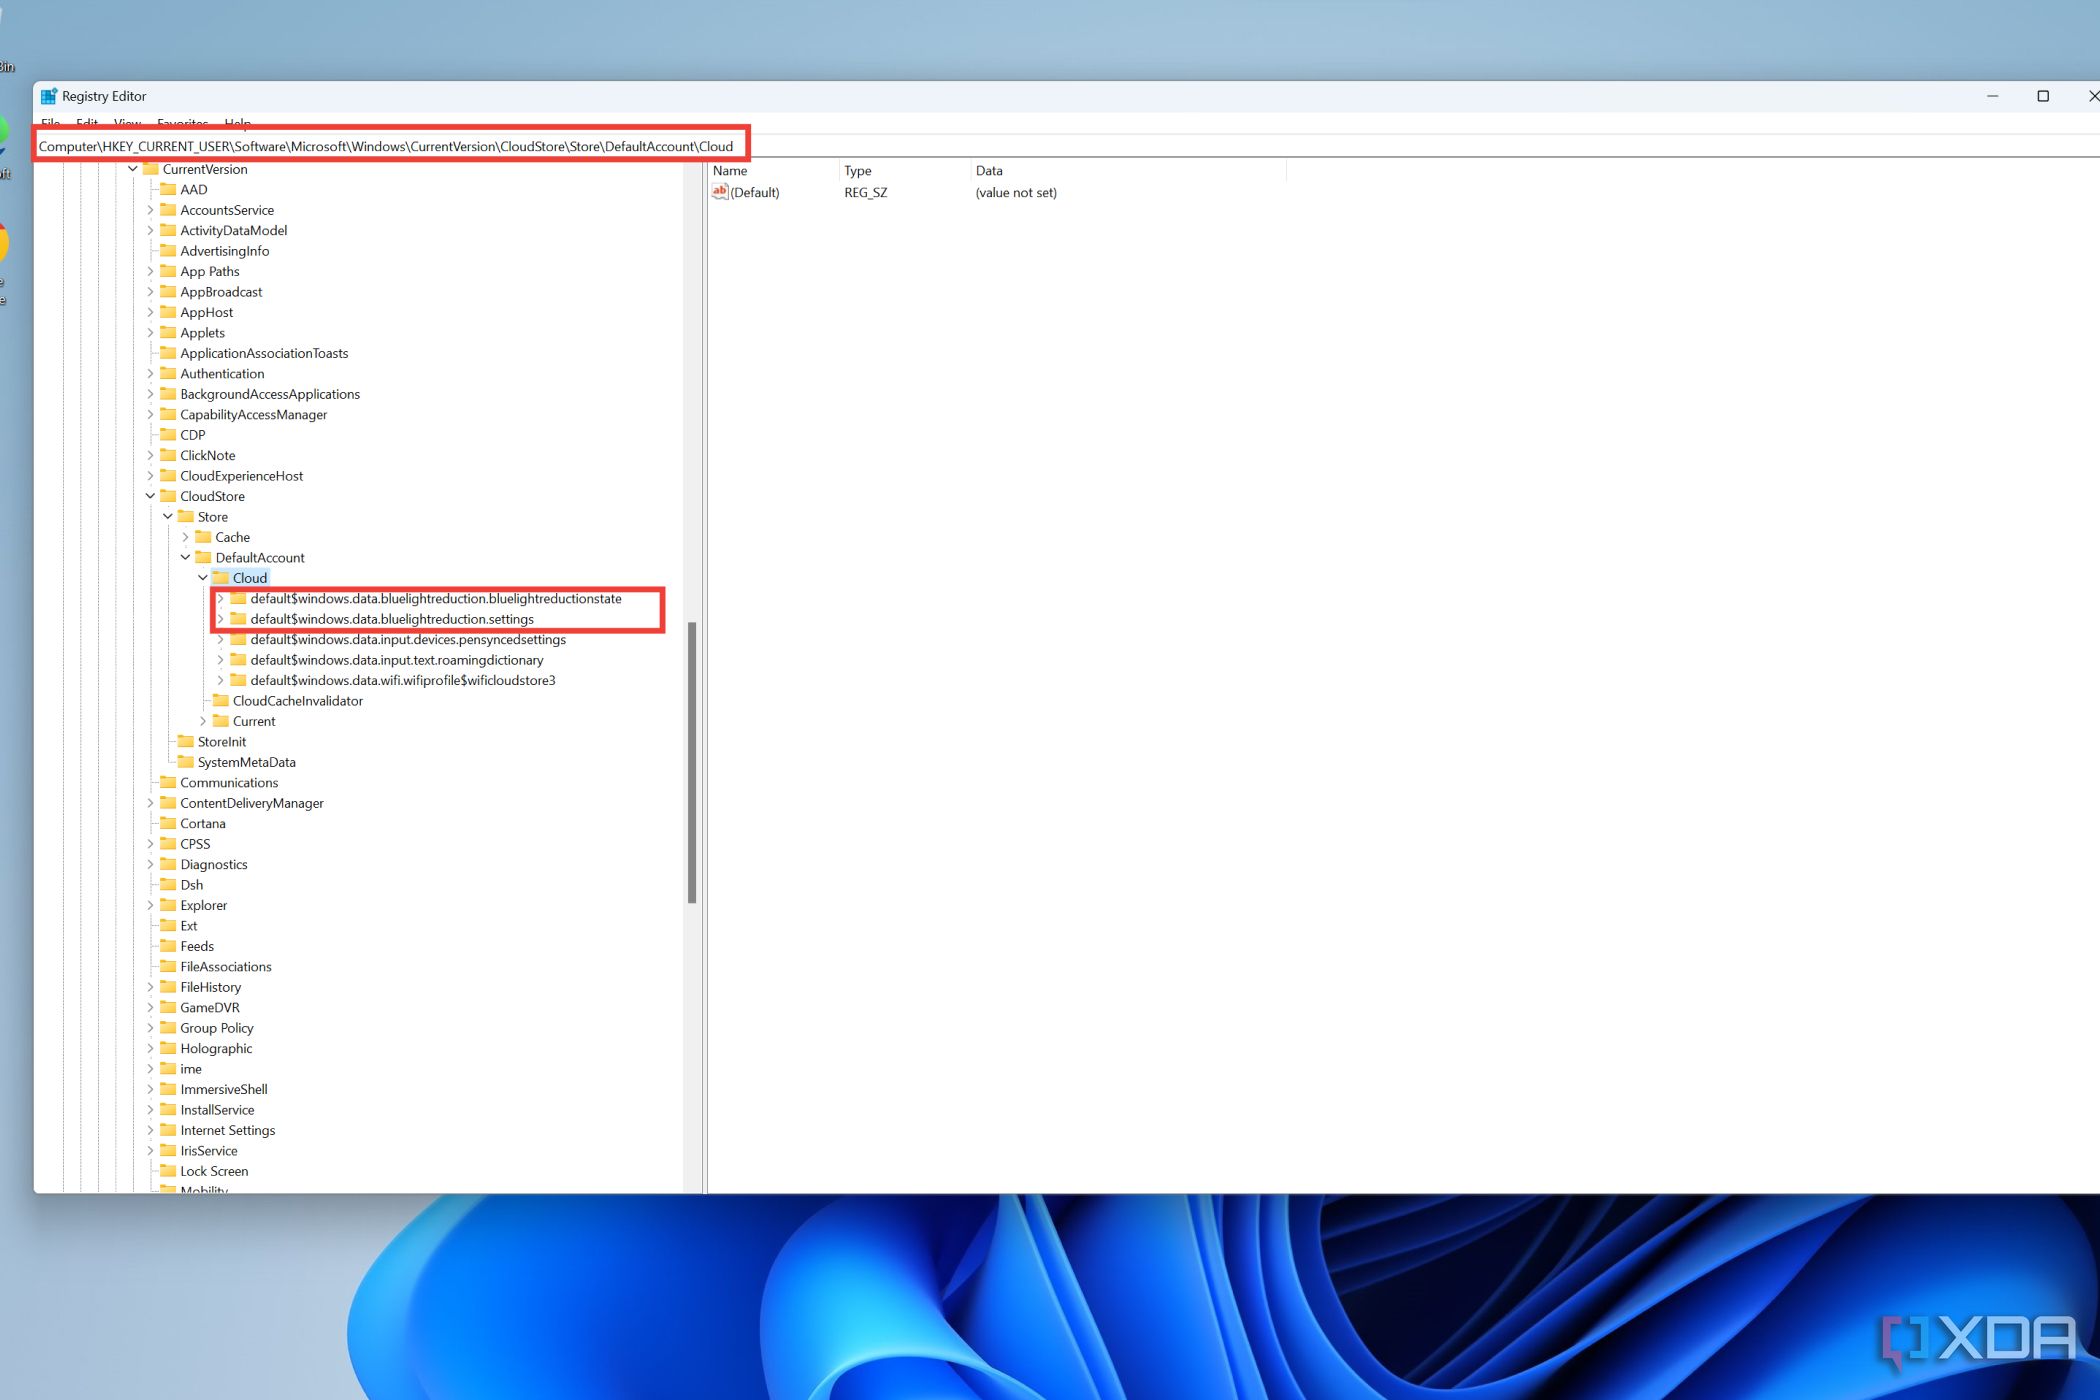
- Copy and paste the following text into the Search bar:
Computer\HKEY_CURRENT_USER\Software\Microsoft\Windows\CurrentVersion\CloudStore\Store\DefaultAccount\Cloud
- Delete the folders named
default$windows.data.bluelightreduction.bluelightreductionstate
anddefault$windows.data.bluelightreduction.settings
- Restart your system.
The night light toggle can also be grayed out if you are using DisplayLink docking stations to connect your laptop to an external monitor. Fortunately, you can enable night light as long as your DisplayLink drivers are version 9.0 or higher.
- Right-click on the Start button and select Run.
- Type regedit and press OK.
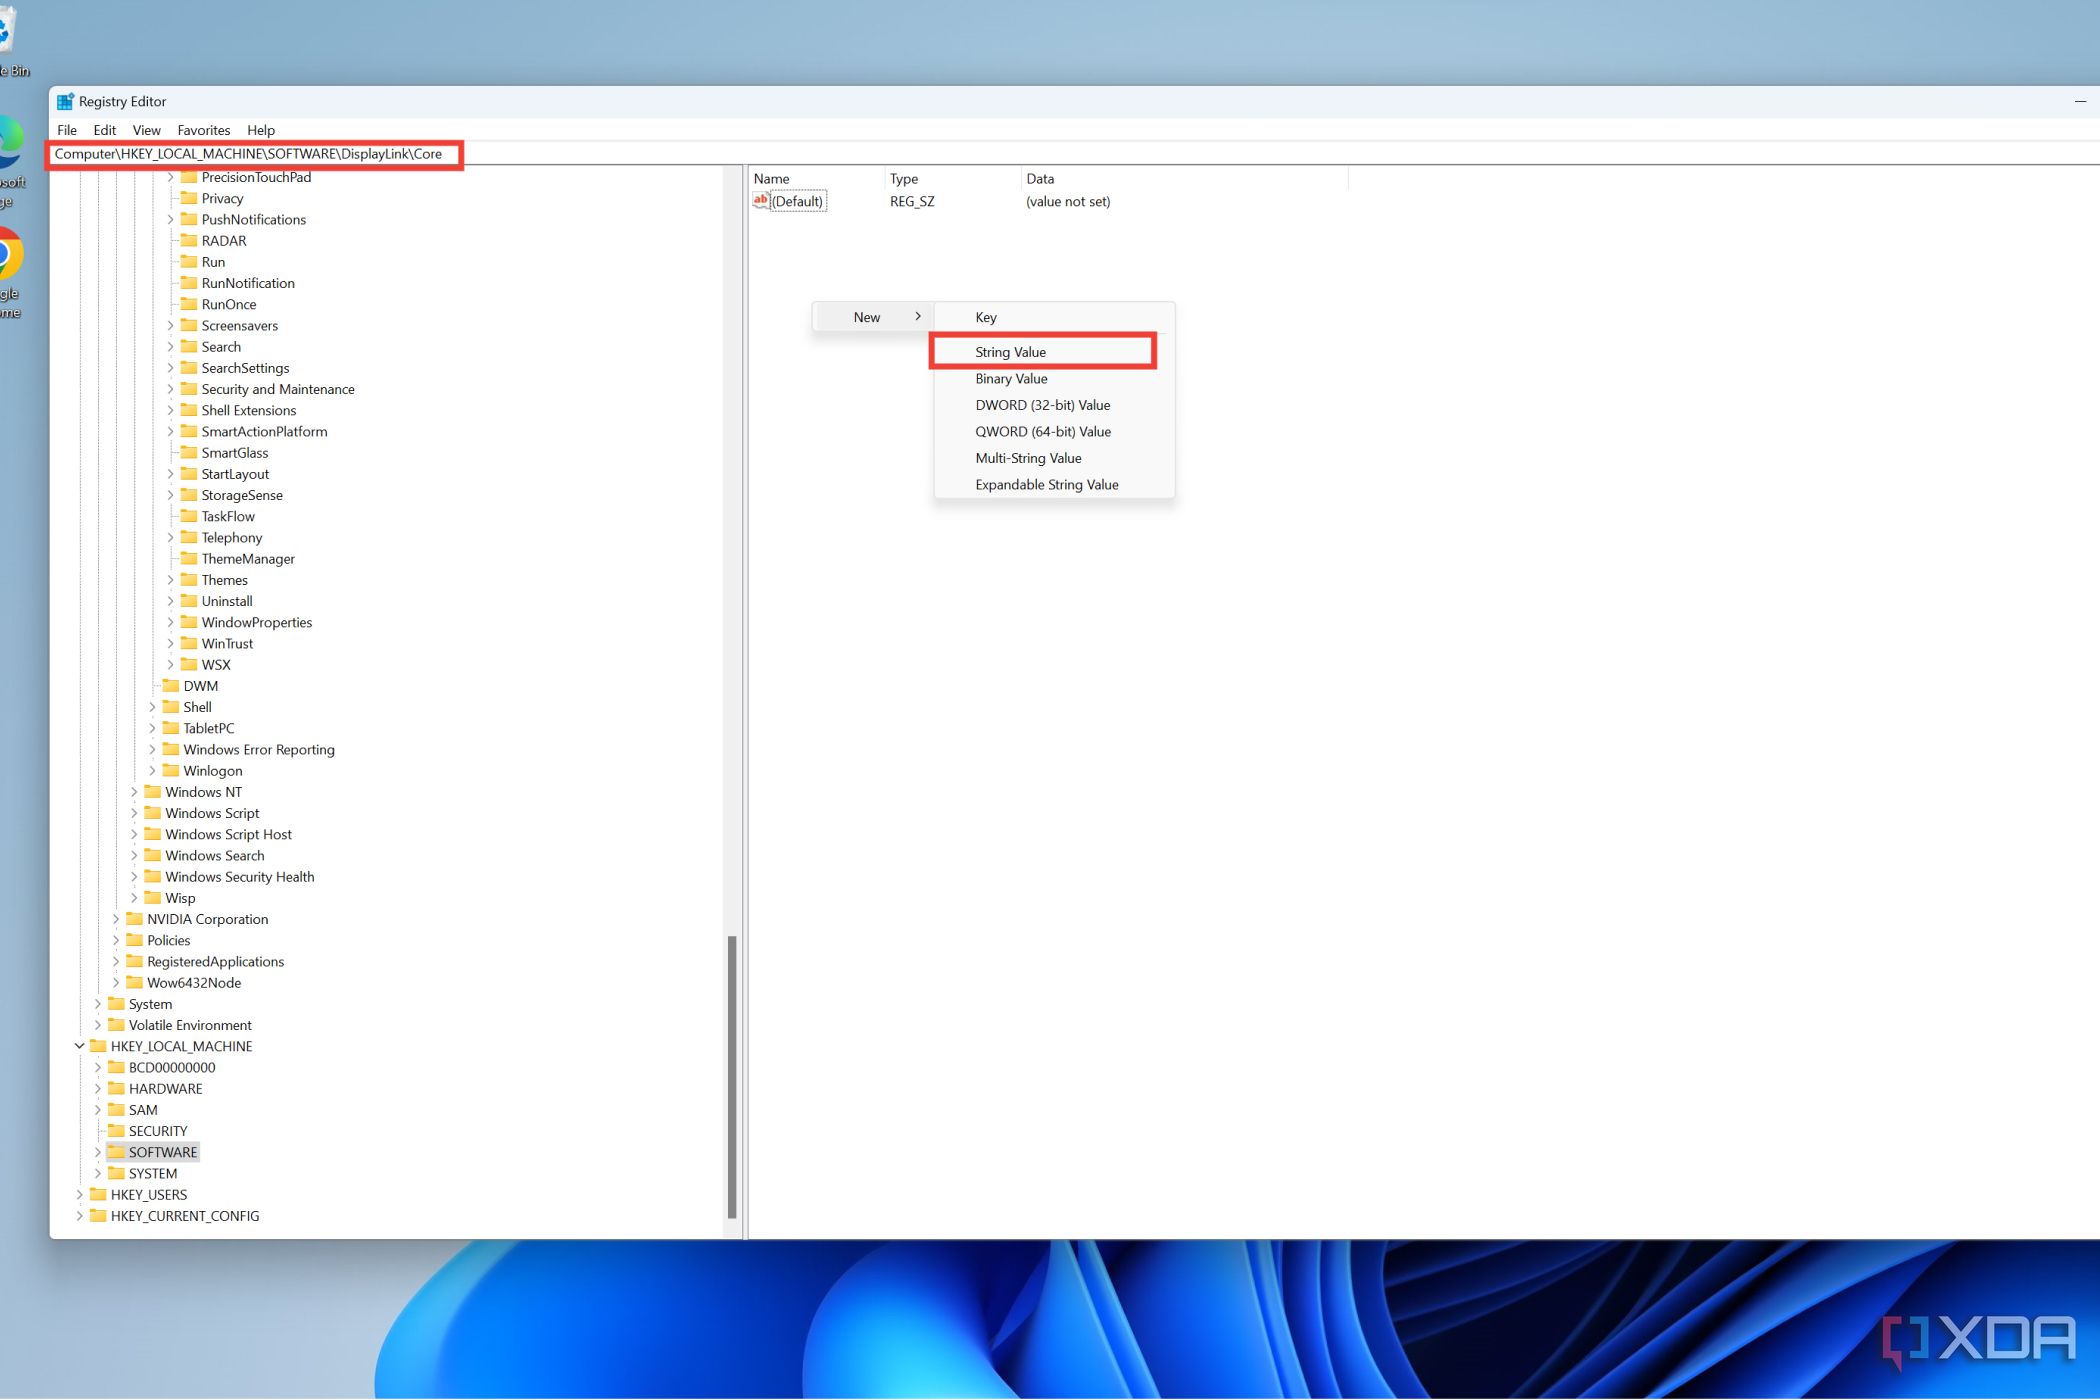
- Copy and paste the following text into the Search bar:
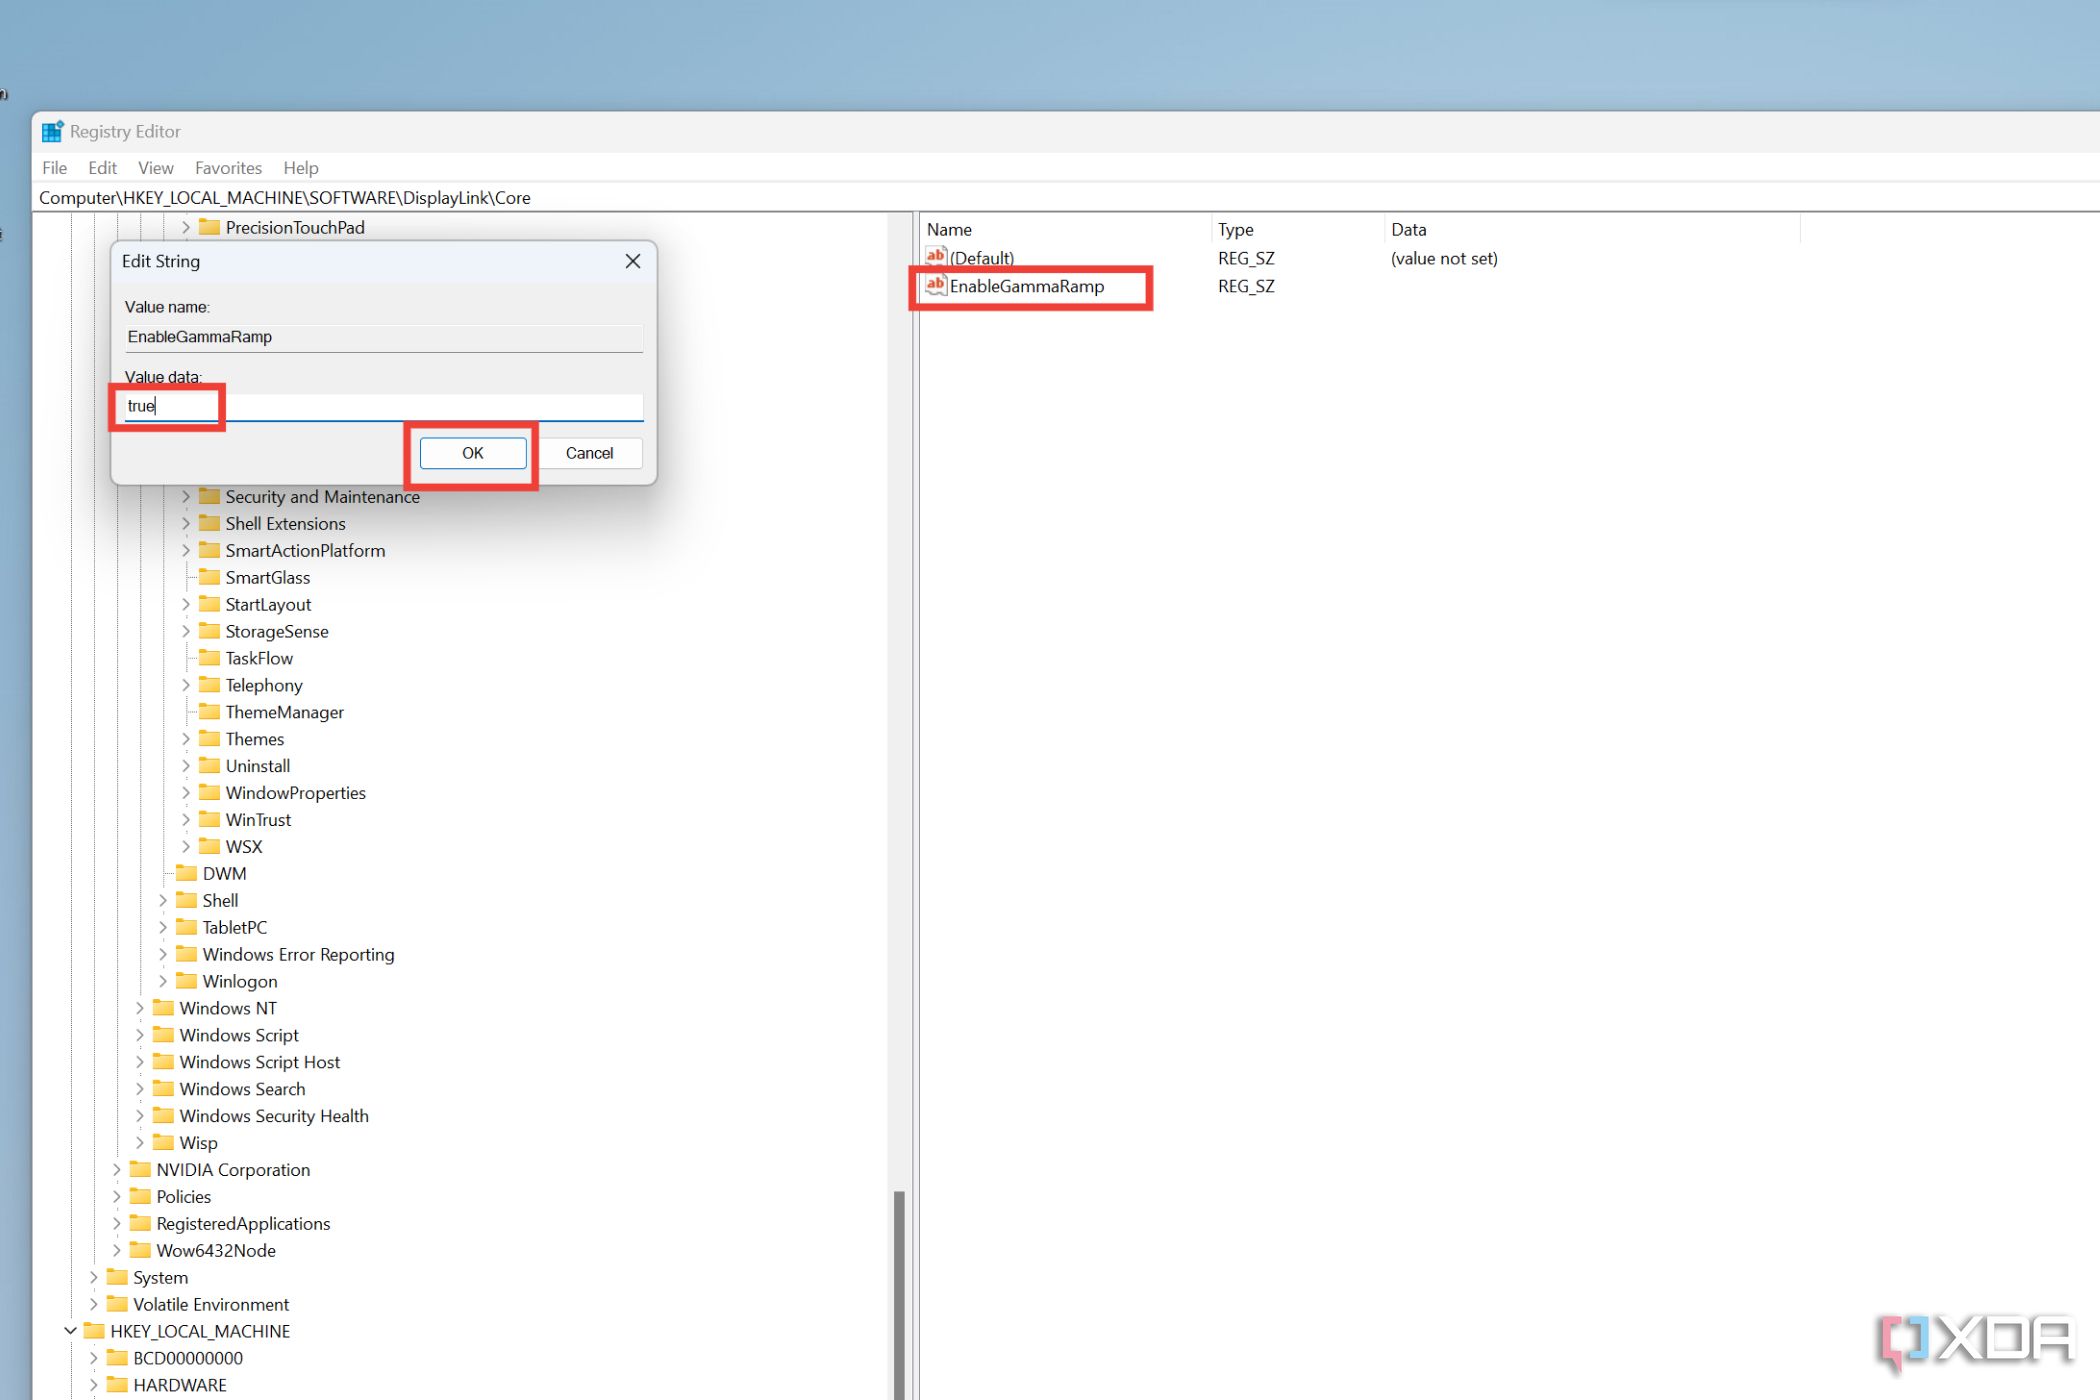
Computer\HKEY_LOCAL_MACHINE\SOFTWARE\DisplayLink\Core
- Right-click on the Core folder and create a new string value with the name EnableGammaRamp.
- Set the Value data as true and click OK.
- Replug your display devices and reboot your system.
How to enable night light using third-party applications
Third-party apps are worthwhile alternatives to Windows 11’s native night light settings. You can also switch to these apps if the night light settings are grayed out, and you don’t wish to mess with the registry editor.
I would recommend using f.lux as it is an easy-to-use software that dynamically adjusts the color temperature depending on the time of the day. The app is also compatible with smart lighting technology, allowing you to sync your f.lux settings with the lights in your house.
Alternatively, you can also use Redshift. Unlike f.lux, Redshift is included in the repositories of Arch, Fedora, Debian, and many other Linux distributions. Redshift is perfect if you want a lightweight app that can control the night light using simple terminal commands.
Our thoughts
It may take a while to adjust to the warmer tones of night light when you're using your desktop PC or great laptop, but turning it on is well worth the hassle as it lowers your eye strain if you frequently work late at night.
If you want to look into other personalization settings available on Windows 11, be sure to check our guide on customizing the operating system.

